This Is the Summer Raspberry Cake Filling Technique You Actually Need
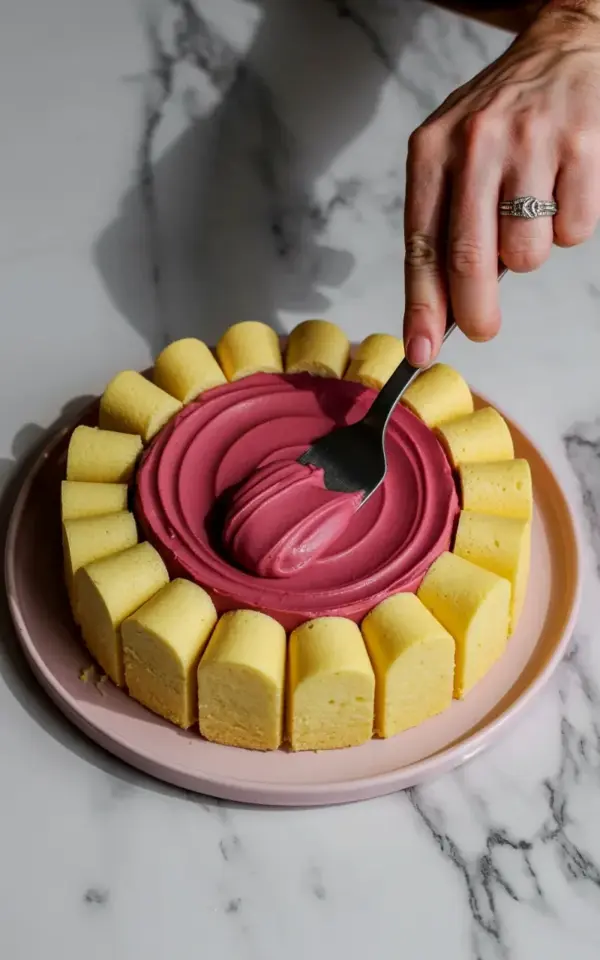
Look, I know we all see those flawless bakery photos and think, “No way I can pull that off at home.” But this summer raspberry cake filling technique is exactly what it looks like: a generous swirl of deep magenta berry goodness settling into the grooves of a scalloped cake. And here’s the thing – you can do it without blowing your grocery budget. The photo shows my hand hovering over a pink ceramic plate, a black spatula spreading that filling into the center of yellow-orange cake pieces. That scalloped edge? That’s not a fancy mold. I’ll show you how to get it with stuff you probably already own. Let’s get real about affordable summer desserts.
Why Scalloped Cakes Are Perfect for Summer (and Your Wallet)
A scalloped cake feels special. Those wavy edges catch the light, hold extra filling, and make people think you spent hours piping or carving. But honestly? The scalloped pattern is just a trick. You don’t need a scalloped pan or a special template. I used a simple round cake – an orange-yellow box mix I doctored up with a little vanilla and lemon zest – and cut it into wedges. Then I arranged the wedges in a circle, leaving a gap in the center. That gap is where the magic happens. The filling pools in the middle and seeps into the crevices between pieces. It’s lazy. It’s smart. And it costs almost nothing compared to a layered torte.
One box of cake mix sets you back maybe two bucks. A pound of frozen raspberries? Three dollars on sale. You don’t need organic, artisanal berries for this. The color comes from a simple cooked berry puree with a little sugar and cornstarch. That deep magenta hue in the photo? That’s from letting the berries break down and then straining out most of the seeds. Not gonna lie, I skipped the strainer once and the seeds drove me crazy. So strain them. Your future self will thank you.
A Raspberry Filling That Won’t Break the Bank
Let’s talk about that filling. The one in the picture is thick, glossy, and almost jam-like. And it’s ridiculously cheap to make. You need three ingredients: raspberries (frozen works great), sugar, and a thickener. I use cornstarch because I always have it. Some people fuss with agar or pectin. Not me. Cornstarch is seven cents a tablespoon. Here’s my rough method.
- Heat 2 cups of raspberries in a saucepan. Smash them with a fork as they soften.
- Stir in 1/4 cup sugar (adjust to your taste – I like it tart).
- Mix 1 tablespoon cornstarch with 2 tablespoons cold water. Pour that slurry into the simmering berries. Whisk fast. It thickens in about 30 seconds.
- Let it cool completely. It will set up even thicker. Do not skip the cooling step – warm filling will soak into the cake and make a soggy mess.
That’s it. No store-bought pie filling, no expensive preserves. And you’ll have leftover filling to spoon over ice cream or yogurt. One batch costs maybe four dollars. A small, fancy jar of artisan raspberry jam would cost more and won’t have that fresh, tangy punch.
How to Get That Scalloped Pattern Without a Proper Pan
Ok so the photo shows yellow-orange cake pieces arranged in a scalloped ring on a pink plate. I’ll tell you exactly how I did it. I baked a single 8-inch round cake. Simple, right? Then I let it cool completely (important). I cut the cake into eight wedges, like slicing a pizza. Then I arranged those wedges in a circle on my plate, with the pointed ends facing outward and the wide, curved crust ends meeting in the center. Wait – that’s not scalloped. That’s just a pinwheel. To get the scalloped look, you need to trim each wedge so the outer crust edge is a gentle curve, not a sharp point. Use a paring knife to round off the corners. Place the wedges with the rounded edge outward. The gaps between wedges create little scalloped indentations. The filling sits in the middle and spills into those gaps. It looks intentional. It’s not. But no one needs to know.
Honestly, you can also use a scalloped cookie cutter on slices of pound cake if you’re fancy. But cutting wedges and rounding them with a knife is cheaper, easier, and gives you that imperfect handmade charm. My silver ring in the photo? I got it at a thrift store for three bucks. It’s tarnished on the inside. But it catches the light really nicely when I’m spreading filling. That’s the kind of detail that makes a photo feel real. Spend your money on raspberries, not on a ring.
Spreading Filling Like a Pro: The Black Spatula Trick
That black spatula in the photograph is my favorite tool. It’s an off-set spatula – a small one, maybe four inches wide. I found it at a dollar store. The handle is plastic but it works perfectly. The key to spreading filling on a scalloped cake is to work from the center outward. Use the flat side of the spatula to push the filling gently into the gaps between cake pieces. Do not press hard. You want the filling to sit on top, not squish down into the cake. A gentle, sweeping motion. Start in the middle, then drag the spatula toward the edge. Stop before you hit the cake pieces. Let the filling settle on its own. That deep magenta layer you see in the photo? I did three passes. First a big dollop in the center. Spread it around. Then added a small spoonful to fill the scalloped divots. Then a final light swirl on top. No swirl marks? That’s fine. A smooth, even layer looks just as beautiful and is easier to eat without making a mess.
One weird tip: chill your cake pieces for 15 minutes before arranging them. Cold cake holds its shape better when you spread filling. I learned that after a hot, crumbly disaster last July. The crumbs mixed into the filling and it looked like a sad pink gravel pit. Do not repeat my mistakes.
Budget-Friendly Decorating Tools You Already Own
Let’s be honest – you don’t need a fancy piping bag or a turntable. For this summer raspberry cake filling technique, the tools are: a plate (pink ceramic or plain white – any color works), a spatula (black, silver, plastic, whatever), and a knife. Maybe a bowl for the filling. That’s it. I use a pink plate because it contrasts nicely with the magenta and yellow. But your grandmother’s white china plate will also look gorgeous. The trick is to let the colors of the filling and cake do the work. Yellow-orange cake with deep berry red. It’s a natural summer palette – like a sunset or a ripe peach. You don’t need sprinkles or flowers. Save your money for extra raspberries.
Also, consider using a dinner plate instead of a cake stand. Cake stands are nice but they cost money and take up storage space. A large, flat plate gives you room to spread the cake pieces in a wide ring. You can see in the photo that the plate is sitting on a white marble surface. That’s my countertop. It’s not real marble. It’s a cheap laminate that I wiped clean. Good lighting matters more than a fancy backdrop. Natural daylight from a window, maybe an hour before sunset. That’s why the filling looks so rich. Not because of expensive props. Just afternoon sun and a clean counter.
Common Mistakes to Skip (Learned the Hard Way)
I’ve made this dessert maybe a dozen times, tweaking it each time. Here’s what I’ve learned to avoid. One: using warm filling. I already said it. Do it anyway and your cake turns into a sponge of sadness. Two: cutting the cake pieces too small. If the wedges are tiny, the scalloped edge disappears. Keep each wedge at least two inches wide at the outer edge. Three: forgetting to scrape down the sides of the bowl when you make the filling. Those little unincorporated bits of cornstarch will form lumps in your final spread. I once had a lump the size of a pea. I picked it out with a toothpick. It was a hassle. Just scrape.
And here’s a weird one: don’t use a silver colored spatula if you’re taking photos. The reflection of the filling on a bright spatula casts a weird pink shadow. That’s why I use a matte black one. It disappears in the photo. The focus stays on the filling. Not that you’re trying to win a photography award. But if you’re posting on Pinterest, small details matter. My black spatula cost one dollar. Best dollar I ever spent on cake decorating.
Serving This Summer Dessert on a Real Budget
This is not a dessert you need to serve with fancy ice cream or coulis. Plain vanilla ice cream or whipped cream is plenty. Or nothing at all – the filling is rich and fruity enough on its own. I serve it on a warm evening, with iced tea. The combination of cold cake, room-temperature filling, and a hot glass of tea? That’s summer. And the whole thing costs about six dollars, feeding six to eight people. Compare that to a bakery slice of raspberry cake which runs five bucks each. You are saving twenty plus dollars. Pocket that cash. Buy more berries for next time.
If you want to dress it up without spending, sprinkle a few fresh raspberries on top right before serving. Maybe a mint leaf from your garden. The contrast in color and texture lifts the whole plate. But honestly, the plain version in the photo is already beautiful. Sometimes less is more, especially when the technique itself looks so good.
So go ahead. Bake a cheap cake, boil some berries, spread that magenta filling into a scalloped ring. You’ve got this. And if you try it, tag me or leave a comment. I’d love to see your version – maybe with a different colored plate or a silver ring from a thrift store. Because that’s what makes baking real. Not perfection. Just a good filling technique and a willingness to get your hands messy.
#summerdesserts #cakedecorating #raspberrycake #scallopedcake #berrycake
This post was researched and drafted with AI assistance, then personally reviewed and edited by Fern before publishing.
Leave a Comment