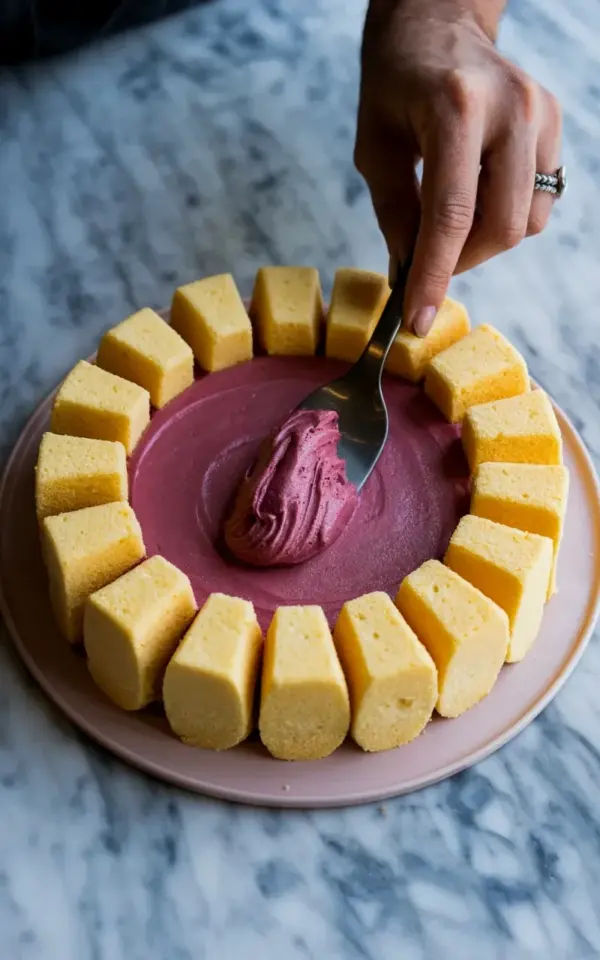
Look at that black spatula pressing into the magenta buttercream, the silver ring catching the light as the blade glides across the cake. Honestly, this is my favorite moment in the whole baking process. This is how to fill a layer cake without losing your patience or emptying your bank account, and the photo above captures it perfectly: a circular pink plate, an inner ring of deep magenta filling, and the outer edge made of yellow-orange cake pieces arranged in a loose scallop. You don’t need a kitchen full of gadgets or a pastry chef diploma. You just need a few cheap tools, a cool surface, and a little confidence.
Fill a Layer Cake With Tools You Already Own
That black spatula in the photo? Mine came from a discount store for about three dollars, and I’ve used it for years. The silver ring is just costume jewelry, by the way, I never remember to take it off before baking, and it always ends up sticky.
For filling a layer cake, you really only need a handful of basics:
- A long palette knife or a flat spatula (a butter knife works too if you’re careful)
- A lazy Susan or any rotating surface, even a plate on top of an upside-down bowl
- A damp paper towel to wipe off crumbs between layers
- Parchment paper strips to keep your cake plate clean
That’s it. No turntable from a professional supply store, no fancy cake scraper, no electric tools beyond the mixer you probably already own. Save your money for the butter and the good vanilla extract.
Budget Buttercream That Still Tastes Like You Spent Hours
For this pink cake idea, you don’t have to buy a specialty bakery frosting. A standard American buttercream made with softened butter, powdered sugar, a splash of milk, and a pinch of salt works beautifully. If you’re really watching pennies, swap half the butter for vegetable shortening. The texture stays spreadable, and the flavor is still sweet and creamy.
The deep magenta color in the photo is easier to get than you think. Gel food coloring is your best friend, and a tiny pot costs a fraction of what you’d pay for a designer cake. Start with a small dot of red gel, add a tiny hint of pink, then let the frosting sit for an hour. The color deepens as it rests. Don’t rush it. That rich, saturated hue only happens if you give the dye time to settle into the buttercream.
How to Build the Scalloped Outer Ring Using Cake Scraps
Notice the outer edge of that cake in the photo? It’s not a perfect round layer at all. It’s pieces of yellow-orange cake cut into little wedges and pressed side by side, forming that wavy scalloped pattern. This is a huge budget trick. Instead of baking two perfect round layers that might come out lopsided, you can bake a single sheet cake and cut it into whatever shapes you want.
I actually love this rustic look. It feels intentional and cozy, like something from a small-town bakery. If you want the same effect, just cut your cake into small rectangles or wedges, line them around your serving plate, and fill the middle with your magenta buttercream. The contrast between the golden cake and the pink filling is exactly what you see in the photo, and it works with any flavor combination.
The Right Way to Spread Filling Over a Cake Layer
The specific moment in the photo is all about the wrist. Keep the spatula flat, almost parallel to the cake surface, and let the weight of the tool do the work. Push the buttercream gently from the center toward the edges. If you press too hard, you’ll drag up crumbs and turn your filling gray. If you press too lightly, you’ll leave thick patches.
The trick is a steady, smooth stroke. Let the spatula glide over the top like you’re spreading jam on toast, not like you’re trying to smooth concrete. I always put a large dollop in the middle first, then spread it out in long rhythmic swipes. After the top is covered, I use the edge of the spatula to nudge the filling into the gaps between the cake pieces. That’s what creates the neat, even look you see in the photo.
And here’s a weird thing I’ve learned: breathe out while you spread. It sounds silly, but holding your breath makes your hand shake. Take a breath, relax your shoulders, and let the spatula move in one continuous line.
Why a Cool Marble Surface Makes Budget Cakes Look Expensive
Marble is naturally cold, which is great for buttercream because it stays firm and smooth while you work. But marble slabs cost money, and not everyone has them sitting on the counter. If you don’t have a marble surface, use a large plate that’s been chilled in the fridge for ten minutes, or a metal baking sheet. That works just as well.
The photo shows the cake on a white marble surface, and the cold stone is why the magenta filling looks so crisp and sharp. No melting, no smearing, no oily streaks. My budget hack is to place my cake plate on top of a chilled marble tile from the home improvement store. Those tiles are cheap, like two dollars each, and they’re a lifesaver for warm summer days.
Keep your spatula cool too. Every once in a while, wipe it clean with a damp cloth. This prevents the buttercream from slipping and keeps the layers neat. Small details matter when you’re doing cake decorating, but they don’t have to cost extra.
Layer Cake Assembly Tips for a Stress-Free Bake
Before you spread any filling, make sure your cake layers are completely cool, or even slightly frozen. Frozen layers shed fewer crumbs, which means you spend less time picking little golden bits out of your pink buttercream. Also, freeze that cake for about twenty minutes before you cut it into pieces for the scalloped edge. It will slice cleanly and look so much prettier.
When you’re ready to assemble, work in a cool room. If your kitchen is hot, turn off the oven and open a window. The buttercream will soften quickly, and that’s when frustration starts to build. Don’t rush the process. Set aside a full hour, put on some music, and just enjoy watching the filling spread and settle. That satisfaction isn’t just a bakingtip, it’s a whole mood.
One last thing: don’t worry about making it perfect. The cake in the photo has a handmade, slightly irregular edge, and that’s what makes it so appealing. If your scallops are a little wobbly or your filling isn’t level, it’s okay, it’s a homemade cake, not a factory product.
So next time you’re staring at two plain cake layers and a tub of frosting, remember this process. Use your cheap spatula, press the cake scraps around the plate, spread that magenta buttercream with a flat, steady hand, and let the cool surface do its magic. You’ll get a beautiful layer cake without spending a fortune. And when someone asks how you did it, just smile and say it’s all in the wrist.
This post was researched and drafted with AI assistance, then personally reviewed and edited by Fern before publishing.
Leave a Comment