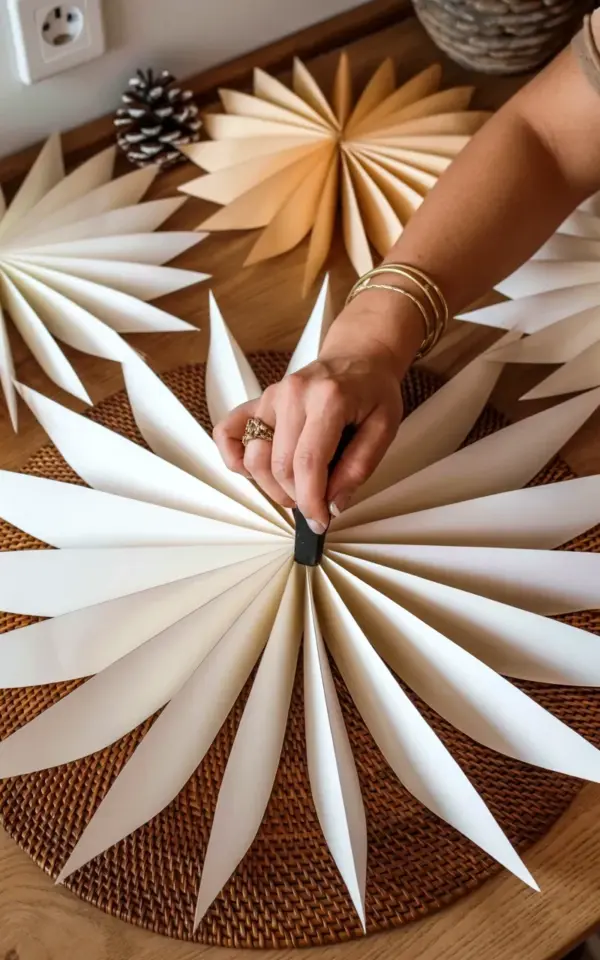
Honestly, I didn’t plan to spend my Tuesday evening wrestling with paper strips and a bone folder, but that’s exactly how this DIY giant paper snowflake happened. Look, I was staring at my bare holiday table, dreading the thought of dropping forty bucks on a sad little centerpiece from the big box store. So I grabbed some white printer paper, a glue stick, and started folding. The photo you see up top? That’s my hands (gold bracelet my grandma gave me, ring I found at a flea market) pressing down on a 16-point starburst while I used a black tool to crease the folds. That brown woven placemat was a dollar at Goodwill. And in the background you can spy a pine cone, some beige cream paper snowflakes I made earlier, and yes, a white electrical outlet that I should have cropped but hey, real life. This project is the definition of budget holiday table decor, and I’m here to share a few different ways you can run with it.
1. The 16 point paper snowflake technique without the headache
So there’s this method floating around the internet that uses 8 strips of paper, folded and glued in a specific pattern, to make a star with 16 points. Not gonna lie, the first time I tried it my snowflake looked like a sad crushed spider. But then I slowed down and made sure each fold was sharp. Here’s the thing: you don’t need fancy tools. My black tool is literally a bone folder I bought for two bucks at a thrift store. If you don’t have one, use the back of a butter knife. Or your fingernail. I’m serious.
The key is to fold each strip in half lengthwise first, then do a V shape at the center. Glue the V’s together one by one, alternating sides. It sounds fussy but it takes maybe 15 minutes once you get the rhythm. And the result is this crisp, architectural star that looks way more expensive than it is. Perfect for a winter centerpiece idea on a budget.
2. Pairing paper snowflakes with pinecones and natural bits
I love a tablescape that doesn’t scream “I bought everything at the craft store.” That’s why I grabbed a handful of pinecones from my backyard. Scatter them around the base of your giant paper snowflake and suddenly it feels cozy, not sterile. The beige paper snowflakes you see in the background? Those are made from kraft paper (leftover from shipping boxes), and they add a warm neutral tone next to the bright white centerpiece.
Consider adding a few sprigs of dried eucalyptus or even cinnamon sticks. Honestly, anything that smells good and costs zero dollars works. You can also tuck little clusters of faux berries if you have them, but I didn’t, and nobody noticed. The contrast between the crisp paper and the rough texture of pinecones is what makes this cheap holiday table decor look intentional.
3. Color combos that don’t scream Christmas (but still feel festive)
Look, I love red and green, but sometimes you want a winter vibe that isn’t so literal. All white is classic. Cream and beige feels modern, almost Scandinavian. But here’s a weird one for you: try a single bright accent strip in your snowflake. One strip of gold foil paper or a deep navy blue mixed in with the white. I did that last year and it looked like a subtle disco ball landed on my table.
If you’re making multiple snowflakes for a runner, vary the sizes and colors. I have two small cream ones next to the giant white one in the photo. The mix creates depth without cluttering. And because paper is dirt cheap, you can experiment without guilt. Mess up? Toss it, grab another sheet. That’s the beauty of paper christmas decorations.
4. Scaling up (or down) for different table settings
The giant snowflake in the photo is about 12 inches across. That’s big enough to be the main centerpiece on a standard dinner table. But if you’re hosting a buffet or a long counter, consider making a few medium sized ones (around 8 inches) and laying them in a staggered line. Or go tiny 4 inch ones and scatter them like confetti around plates. I tried that for a brunch setting and it was ridiculously cute.
The folding technique scales perfectly because you just adjust the length of your paper strips. Shorter strips = smaller star. Longer strips = giant showstopper. Pro tip: if you go really big (like 18 inches), use cardstock instead of printer paper so it doesn’t flop. And maybe skip the glue and use a hot glue gun for extra hold. But honestly, regular glue stick works fine for most sizes.
5. Why this beats store bought decor (and saves your wallet)
I priced out a comparable centerpiece at Target last week: a gold wire snowflake thing plus a fake pine cone arrangement. Forty-two dollars. My version cost maybe a dollar in paper and glue. Plus I got the satisfaction of making it myself, which is its own kind of joy. Is it perfect? No. One of my points is slightly crooked and if you look close you can see a glue smear. But that’s what gives it character. People will think you bought it from some expensive boutique, and you can just smile and say “Thanks, I made it with printer paper.”
Another reason this works: it stores flat. Slide it into a folder between pieces of wax paper, and next year it’s good to go. No bulky ornaments, no tangled lights. For anyone trying to simplify holiday storage on a budget, that’s a huge win. So yeah, I’m basically a paper folding evangelist now.
6. Placement ideas for your paper snowflake centerpiece
- On a placemat like I did with the brown woven one. It anchors the snowflake and keeps it from sliding around.
- On a cake stand for height. Stack two or three different sized snowflakes on a tiered stand for a snowflake tower effect.
- Hanging above the table from a clear fishing line. Giant paper snowflakes look amazing suspended.
- Scattered on a sideboard with candles and pinecones. Even one or two small ones break up the blank space nicely.
- On each plate as a napkin ring or a favor. Tiny snowflakes (3 inches) with a ribbon loop make an instant gift topper.
One last thing: that white outlet in the background of my photo? It reminds me that my craft space is a cluttered mess, but the snowflake came out great anyway. You don’t need a pristine studio to make nice things. Just some paper, patience, and a willingness to have one slightly crooked point.
So if you’re staring down a bare holiday table and a tight budget, give this a try. Grab some paper, fold until your fingers ache a little, and plop a pine cone next to it. Pin this for your next Christmas craft session, and when you make one, tag me. I want to see your 16 point masterpiece, even if there’s an outlet in the background.
#DIYpapercraft #holidaytabledecor #budgetdecor #paperchristmas #wintercenterpiece
This post was researched and drafted with AI assistance, then personally reviewed and edited by Fern before publishing.
Leave a Comment