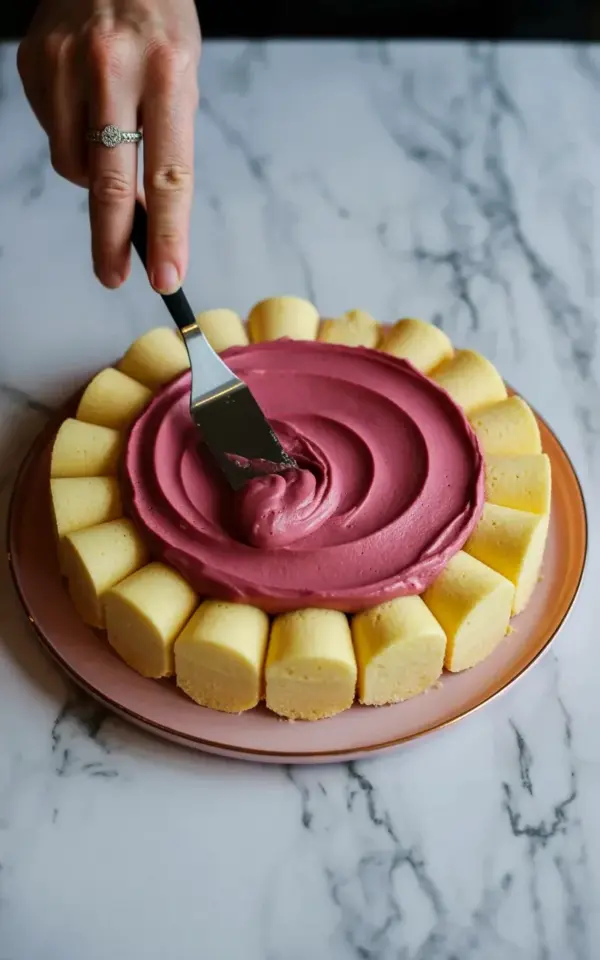
The sharp smell of leftover birthday cake probably isn’t the first thing you want in your kitchen on a Tuesday afternoon. But look, that dry yellow-orange slab sitting in the container? It’s not a waste. This budget cake filling hack turns those sad scraps into a stunning scalloped layer cake that looks like you actually planned it. I’m not gonna lie, the contrast of deep magenta filling against those warm golden pieces on a pink plate is almost too pretty to eat. Almost. Let’s get into the process.
Leftover cake usually gets tossed, crumbled into truffles, or buried under ice cream. Honestly, the truffle route is boring and the trash route is just sad. Here’s the thing: you can repurpose those pieces into something that has real structure and visual appeal. I’m spreading a vivid magenta filling into the center of those scalloped yellow-orange pieces, and the result is a dessert that feels fancy without the fuss. It’s a practical way to use what you have, and it costs next to nothing.
## Scalloped Cake Layers From Scraps
Ok so, the scalloped look isn’t some complicated piping technique. It’s just geometry. You need cake pieces that have a curved edge. I cut my leftover yellow cake into small, crescent-like shapes using a round cookie cutter. The leftover dough, or cake in this case, gets a second life. You arrange these pieces in a circle with the curved sides facing outward to create that beautiful fluted, petal-like edge. It looks like a flower, or a vintage doily, or something you’d see in a bakery window.
Honestly, if you don’t have a cookie cutter, just use a small knife and freehand it. Nobody is checking for perfect symmetry here. The tiny gaps between the pieces will get filled with the magenta filling later, which actually helps seal the whole thing together. I used a yellow-orange cake because the color contrast is unreal, but vanilla or even a light spice cake would work fine.
## How to Make Magenta Cake Filling
For the bold pink filling, you don’ need a fancy pastry chef recipe or anything expensive. I used a simple buttercream base, but you could also use a stabilized whipped cream if you prefer something lighter. The “magenta” part came from a few drops of concentrated gel food coloring. I used a deep raspberry shade, but you can adjust it to whatever you have.
Here’s my honest tip: taste as you go. This makes a sweet filling, too much food coloring can give it a weird chemical taste. Start with two drops, mix it, then add more. You want that striking, deep pink color that almost borders on purple, not a baby pink. It should scream “berry” and add a serious punch of color against the golden cake. The filling needs to be slightly firm, not runny, so it holds its shape when you spread it. A soft, fluffy texture is your friend here.
## The Best Tools For Spreading Filling
You need to make smooth, swooping swirls in the middle of the plate. This is the part where the visual really comes together.
– **A small offset spatula** is your right hand here. It makes swooping curves feel natural.
– A **bench scraper** can help if you need to smooth the edges, but it’s not critical.
– **A piping bag** with a round tip works if you want to fill the gaps between the cake pieces first.
The black spatula in the photo is what I use for the final flourish. It looks clean and creates those beautiful, soft peaks in the filling. You don’t need a huge toolkit for this, honestly, a butter knife works in a pinch, but it won’t give you that same smooth motion.
## Step-by-Step Guide to Layering
Let’s get into the actual process of putting this masterpiece together. It goes fast.
Start with a flat plate or cake stand. A pink ceramic plate adds to the whole vibe, but white works too. Place a small dab of filling in the center of the plate to act as glue. Then, start arranging your scalloped cake pieces around the edge, overlapping them slightly. Press them gently so they stick. The goal is to create a ring that will hold the filling like a bowl.
Now for the fun part. Spoon a generous amount of the magenta filling into the center of the ring. You want it to be piled high, not just a thin layer. Use your spatula to spread it outwards toward the cake edges, but don’t cover them. You want the scalloped borders to peek out. Create swirls and peaks in the surface. A few sharp flicks of the wrist with the spatula will create those nice, Instagram-worthy peaks. Hold the spatula flat and pull it up suddenly. You’ll see what I mean.
## Decorating Ideas Without the Fuss
This is where you get to play. The beauty of this dessert idea is that it doesn’t need to be perfect. It’s supposed to look rustic and homemade.
– Dust the edges with a little powdered sugar before adding the filling. The white against the magenta looks fantastic.
– Sprinkle some crushed freeze-dried raspberries on top of the filling for texture.
– Add a few fresh mint leaves for a pop of green and a fresh scent.
I added some dark chocolate shavings once, just to see what would happen, and it was honestly delicious. The bitterness of the chocolate cuts through the sweet filling really nicely.
## Common Mistakes and Quick Fixes
Look, I’ve messed this up a few times so you don’t have to. The biggest issue is when the cake pieces slide around. If your leftover cake is really dry, the filling won’t stick to it. Try brushing the inside of the cake pieces with a little milk or simple syrup before arranging them. It rehydrates the crumb and gives the filling something to grip.
Another problem is when the filling is too soft to hold up. If you’re using buttercream and the room is warm, it can start to droop and lose its shape. Pop the whole plate in the fridge for ten minutes before serving. The cold sets the filling and makes it look sharp. Also, if you run out of filling, just whip up some more. It’s not a big deal.
There’s something very satisfying about making a budget cake that looks like you spent hours on it. This is one of those clever dessert ideas that makes people say, “Wait, that’s just leftover cake?” whenever they see it. It’s resourceful, it’s colorful, and it tastes like a real treat.
The next time you have leftover cake scraps, don’t just crush them into the bottom of a parfait glass. Spread that magenta filling high, make your scalloped edges, and admire the contrast. Let me know what color filling you try, or if you use chocolate cake, word of warning: the magenta might not pop as much, but it’ll still be delicious. Enjoy every bite of it.
This post was researched and drafted with AI assistance, then personally reviewed and edited by Fern before publishing.
Leave a Comment